Skip to content
Nanaimo Custom Bathrooms

Bathroom renovation services

Bathroom Tiling & Waterproofing

On the coast a bathroom fails from the inside out, so the waterproofing layer is detailed and checked before any tile is allowed to cover it.

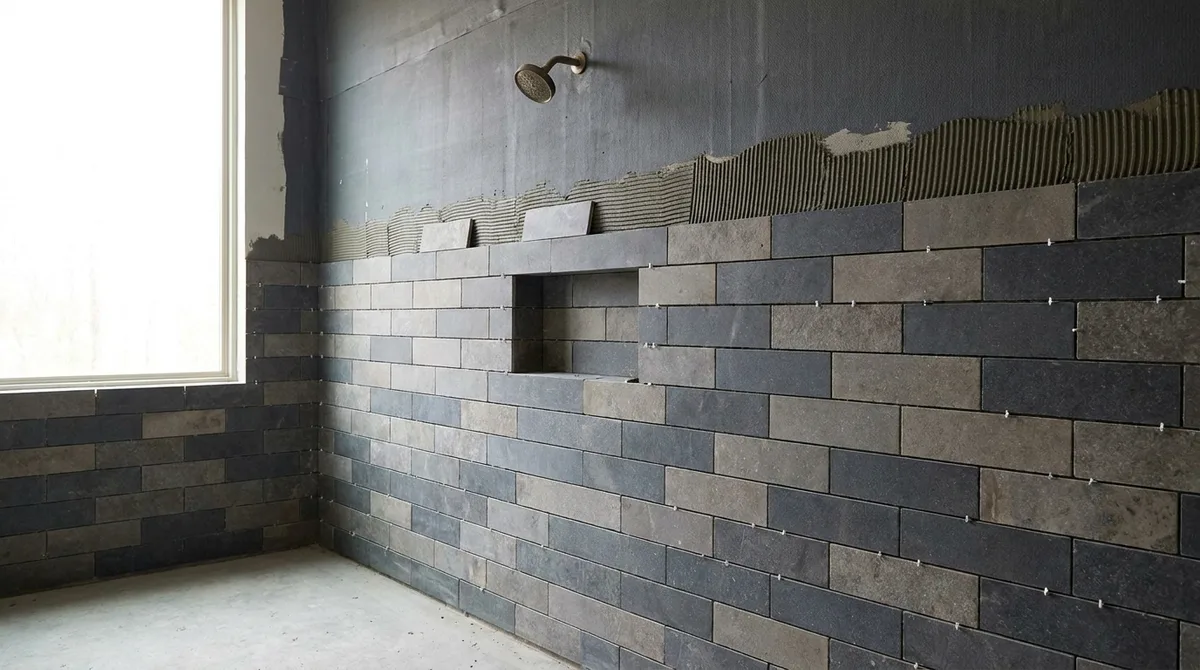
Large format wall tile being set over a waterproofed shower wall with a framed niche

On the coast a bathroom fails from the inside out, so waterproofing is detailed and checked before any tile covers it.

  • Licensed & insured
  • WorkSafeBC coverage
  • Written quotes & contracts
  • Built to BC Building Code

What this covers

Bathroom Tiling & Waterproofing

Tile is not waterproof. Grout is not waterproof. Both are porous, and both are designed to let a certain amount of moisture through to a layer behind that is meant to stop it. When a tiled shower fails, it almost never fails at the tile — it fails at a corner, a change of plane, a drain flange or a pipe penetration in the layer nobody can see anymore. That is why the waterproofing is the part of this trade worth talking about, and the tile is the part that gets photographed.

Why the coast is different. A bathroom in Nanaimo, Ladysmith or Qualicum Beach dries more slowly than the same bathroom in a dry interior climate. Ambient humidity stays high for much of the year, older wall assemblies were built with vapour strategies that predate modern shower use, and a room that never fully dries puts a continuous rather than intermittent load on every joint. Slow, low-grade moisture movement into a stud bay is more destructive over time than an obvious leak, because an obvious leak gets fixed.

What a waterproofed shower actually requires. The substrate first: standard drywall does not belong in a shower enclosure, and moisture-resistant board is not the same thing as a tile backer suited to continuous wetting. Over that, a continuous waterproofing membrane — sheet or liquid applied — taken from the shower floor, over the curb on all three faces, into every internal corner, up the walls to above the shower head, and lapped correctly at every change of plane. Internal corners and changes of plane get a reinforcing band because that is where movement concentrates. Pipe and valve penetrations get purpose-made seals rather than a smear of sealant. The membrane is bonded to the drain flange itself, not merely dressed near it, because the drain connection is the single most common failure point in a tiled shower floor. Where the assembly allows, a flood test is worth the day it costs.

Slope and drainage. A shower floor is sloped a consistent quarter inch per foot to the drain. With a centre drain that means four planes meeting at the outlet and four hips running to the corners, and the tile has to be small enough to follow that geometry — mosaic or small format there is a requirement, not a style choice. A linear drain at one wall allows a single sloping plane, which permits large format tile and makes a curbless entry far easier to detail. Under either approach the pre-slope beneath the membrane matters as much as the finished slope above it, because water reaching the membrane needs somewhere to run.

Setting out is decided before the first tile. Where the cuts land is the difference between tiling that looks resolved and tiling that looks like it happened. Setting out starts from the most visible plane and works outward: full tiles at the entry and at eye level, cuts pushed to the least visible corner, courses aligned so the niche sits within full tiles, and the top row not left as a 20mm sliver at the ceiling. Where floor and wall tile meet, the joints either align deliberately or offset deliberately — the thing to avoid is nearly aligning. Large format tile adds its own demand: the substrate has to be flat to a much tighter tolerance, because a 600 x 1,200mm tile telegraphs any hollow beneath it and lippage shows under raking light.

Movement joints are not optional. Tile assemblies expand and contract, and the substrate behind them moves at a different rate. Every internal corner, wall-to-floor junction and change of plane gets a flexible sealant joint rather than grout. Grout in a corner cracks — reliably, within a year or two — and then reads as a workmanship problem. Perimeter joints do the same work for the floor.

Feature and accent tile. A herringbone panel, a mosaic niche back, a run of handmade zellige, a contrasting shower floor — these carry a room, and each has a technical consequence. Handmade tile has variable thickness and needs a thicker bed and wider joints. Mosaic sheets need their seams disguised or they read as a grid. Metallic and glass tiles need a white setting bed or the adhesive colour shows through. Polished porcelain on a shower floor is slippery and generally the wrong choice regardless of how it looks in a showroom.

Tile replacement and repair. Matching into existing tile is often harder than replacing a whole surface, because production runs change and an older shade is unlikely to still be available. Where a section of shower tile has failed, the real question is usually whether the waterproofing behind it has failed too, and re-tiling over a compromised membrane simply defers the same job.

Why it matters

What you get

Continuous membrane, checked before tile

Floor, curb, corners, changes of plane and the drain flange are treated as one continuous layer and inspected before anything covers it.

Substrate suited to continuous wetting

Tile backer chosen for the wet zone rather than moisture-resistant drywall, which is a different product for a different job.

Slope and drain planned together

Centre drain with four planes and small format tile, or a linear drain and a single plane that permits large format and a curbless entry — decided before the floor is formed.

Setting out resolved on paper first

Full tiles where the eye lands, cuts pushed to the least visible corner, and courses set so the niche sits within full tiles.

Flat enough for large format

Substrate flatness is brought within the tolerance large tile requires, because lippage and hollows show under any raking light.

Flexible joints where movement happens

Internal corners, wall-to-floor junctions and perimeters get a flexible sealant joint rather than grout, which cracks there within a year or two.

How it runs

The process

  1. 01

    Assess and prepare the substrate

    Existing surfaces are checked for flatness, soundness and suitability, and the wet zone is sheeted with tile backer rather than standard board.

  2. 02

    Form the floor and curb

    The pre-slope and finished slope are set to a consistent fall, and curbs and benches are built solid ready to be waterproofed on every face.

  3. 03

    Waterproof and test

    The membrane is applied continuously with reinforced corners and sealed penetrations, bonded to the drain flange, and flood tested where the assembly allows.

  4. 04

    Set out the tile

    Courses are planned from the most visible plane outward, with niche, feature panels and floor-to-wall joint relationships decided before the first tile is set.

  5. 05

    Tile and grout

    Tile is set with full coverage appropriate to the format, then grouted once the adhesive has cured, with the grout colour chosen against the joint width.

  6. 06

    Seal the movement joints

    Corners, changes of plane and perimeters are finished with a flexible sealant matched to the grout, and the surface is cleaned down.

The layer that decides whether the tile lasts

The waterproofing assembly is detailed and checked before tiling starts, because it cannot be inspected afterwards.

Questions

Frequently asked

The usual signs are indirect: a musty smell that does not clear, a soft or springy spot in the floor outside the shower, staining on a ceiling below, grout that stays dark long after the shower has dried, or loose tiles that sound hollow when tapped. A cracked corner joint where grout was used instead of sealant is a common entry point. None of these are proof on their own, but together they justify opening a small area to look, which is far cheaper than re-tiling over a failed membrane and doing the job twice.

Technically it is sometimes possible on a sound, flat, well-bonded wall outside the wet zone, but in a shower it is generally the wrong call. Tiling over existing shower tile leaves the old waterproofing — or the absence of it — in place and buried, adds thickness that fouls the door jamb and the valve trim, and puts the new assembly's weight on the old adhesive bond. In a shower, taking it back to the substrate and building the waterproofing properly is the only version worth doing.

Cement-based grout is standard, and it is porous, so it benefits from sealing and will still discolour over time in a shower. Epoxy grout is non-porous, stain resistant and does not need sealing, but it is more demanding to install and less forgiving on wide or irregular joints. For a shower floor with a lot of grout line, epoxy is often worth it. Joint width matters too — narrow joints look cleaner but leave less room for the tile's own dimensional variation, which is why handmade tile needs wider joints.

Because grout was used where a flexible joint was needed. Internal corners, the junction where the wall meets the floor, and any change of plane are movement joints — the two surfaces expand, contract and settle at slightly different rates, and rigid grout cannot accommodate that. Those junctions should be filled with a flexible sealant colour-matched to the grout. Repairing it means raking out the failed grout completely and re-filling correctly, not adding more grout on top.

The controlling factor is curing, not labour. Tile adhesive needs to cure before grouting, grout needs to cure before it is exposed to water, and silicone needs to cure fully before the shower runs. Beyond that, glass is usually templated after tiling and takes time to fabricate. The sequence is set out in the schedule before work begins so the room's return date is a planned figure rather than an estimate made at the end.

It is worth attempting but rarely exact. Tile production runs change, and shade, size and surface texture drift between batches, so a repair patch usually reads as a patch even with the same product code. Where a spare box was kept from the original job the match is good. Where it was not, the honest options are to accept a visible repair, to re-tile a full plane so the difference falls at a corner, or to treat it as a feature. Which of those makes sense depends on where the damage is.